Monday was a pretty good day. I spent most of the morning finishing up my shellac work on my pallet forks. I was pretty much finished with my shellac job pretty early on in the morning, but I ran into some trouble with getting/keeping my forks and stones clean. When I was working with a couple of the forks, I let one side get too warm, so a tiny bit of the shellac ended up flowing through to the front on just one of the stones. To clean that off, I soaked a sharpened piece of pegwood in some alcohol and gently cleaned the stones. After cleaning everything, I dipped my forks in some One-Dip (a cleaning solution that is used for balance wheels/balance completes, and is safe to use with shellac) and didn’t dry them properly, so they were picking up some dust/lint on the fork and stones. To compound issues, the pegwood I was using was, for lack of a better wood, fraying. When I used it to try to clean the stones, little pieces came off and got on to the stone. Thus, a crazy cycle of attempting to clean my stones and keeping them dirty, until my teacher suggested using some rodico before doing the One-Dip. This combination worked like a charm.
Once I got the stones cleaned, my next step with the pallet forks was to learn how to remove, shape, and replace the pallet fork guard pin.
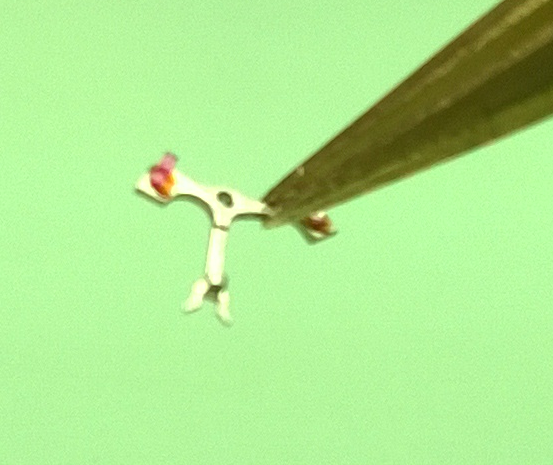
 When you are looking at this picture, the guard pin is the pointed pin protruding from the end of the pallet fork. To remove this pin, you need two pairs of tweezers-I used my brass ones, and a pair of stumpy, broadish tweezers. Using the brass tweezers, hold the pallet fork firmly in place and grasp the pin with the other pair. You should, with enough force, be able to gently slide the pin out (if not, you can snip the end and use a needle to push the pin out). Once you do, you are left with a pin and the empty pallet fork.
 Once the pin has been removed, you need to use that as your template for the new one you make. The process is very similar to making the pins for collets and studs.
 Super large picture, but the pin on the bottom is the one that was removed from the pallet fork. The soon-to-be pin above it is the size of an un-shaped collet pin. As I said, you follow the same shaping procedure from the collet exercise (file, taper, polish), but this time, instead of using just the one emery paper (a 2000 grit), I used increasing grit of emery paper (2000->2500->3000->4000) to get a really nice polish.
Once you have the pin shaped (it will be longer than it needs to be), you need to check the taper by placing it in the pallet fork. You want the taper to be enough that the end extends past the horns of the fork (it is easier to remove the length than wish you had more to add) but doesn’t have any gaps on either side of the hole that it goes through.
 Sadly, I didn’t snap a picture before this state, but there was a longer part of the pin protruding to the left that I had snipped off. Once you snip that end, take the stumpy tweezers and push the pin in a bit more-be careful because if you push too much, you can snap the part of the fork that holds the pin… ask me how I know. Once you get the pin snug, you need to use the file that you shaped the pin with to file away the extra length so it looks flush. Before you file it, you can tape the pallet fork down to your bench block to protect the fork from the file. Once you get that end trimmed and filed, you need to trim and shape the other end. Leaving it taped to the bench block, you want to slide another piece of tape underneath the pin, but above the horns and trim it just a bit. Once it is trimmed, you need to shape the the left and right sides at a 45° angle.
 Once you have the pins trimmed, you need to make sure that you have the pins even between the horns, and parallel/straight when viewed from the side.
Once I got those done, I started the next project which is working with the pallet arbors-removing and replacing them. If you look at the picture above, there is no arbor in the pallet. To get it to that state is pretty straight forward, plus, I got to use a new tool!
 This is a jeweling tool. It is primarily used for adding and removing jewels in movement plates, but it is a pretty versatile tool. It is similar to the staking set because it has various punches and stumps that it uses. One of the main differences is you don’t use a hammer with it. The handle is resting on a stake that has a spring wrapped around it. The stake has a rounded top that sits above a micrometer (don’t hold me to that, I can’t remember if that is what the part is called) that rotates around and determines how far down the stake and punch goes.
 Place the pallet on the stump and slowly lower the punch towards it. Once the punch is flush with the fork, take it off and and place the pallet fork in a pin vise and essentially spin the fork free from the arbor.
 I haven’t started replacing the arbors yet-I have a couple that are being pretty stubborn and may require a smaller stake-I’ll find out tomorrow. I’m excited about my Saturday update because I should have some really cool things to talk about (some extra-curricular activities that I’ve been excited to get started), so stay tuned!
